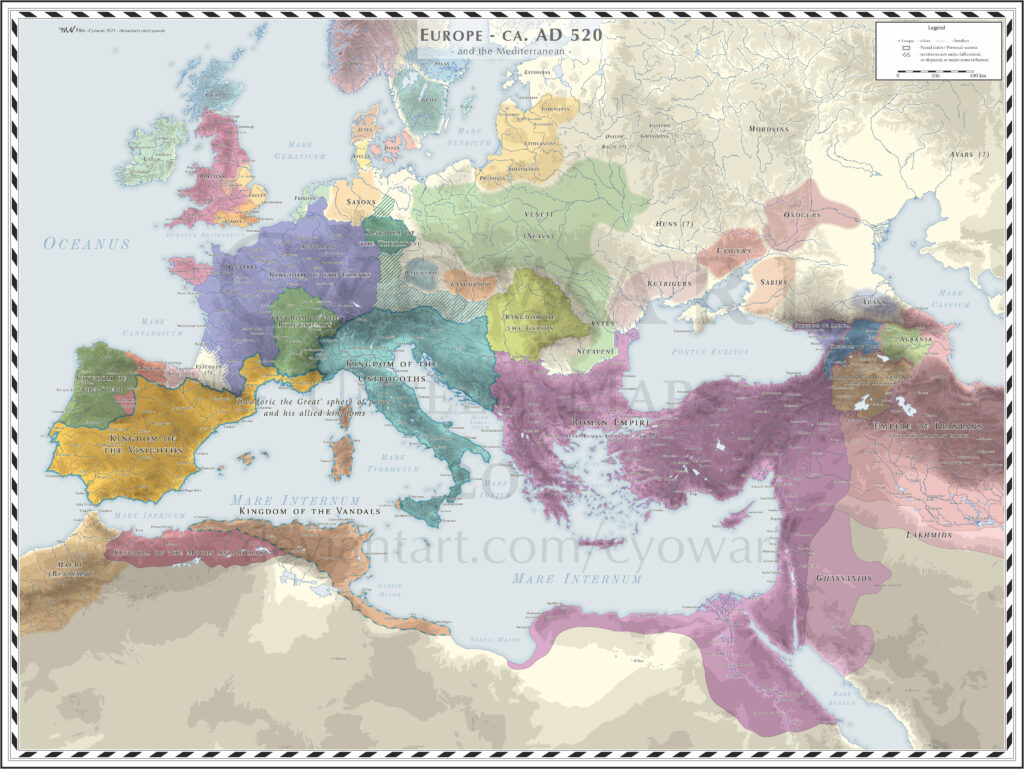
Map © Cyowari
Toward the End of the Iberian War
By AD 531, the long and costly Iberian War between the Roman Empire and Sassanid Persia was approaching its final chapter. Although the major confrontation at Callinicum had ended without a decisive strategic result, neither Emperor Justinian nor Shahanshah Kavadh was prepared to abandon their objectives. The Romans sought stability along their eastern frontier, while the aging Persian monarch remained determined to secure a position of strength before entering peace negotiations. What followed was a dramatic series of campaigns marked by stubborn sieges, daring cavalry engagements, sophisticated intelligence operations, and intense diplomatic maneuvering.
The final years of the conflict witnessed some of the most remarkable episodes of the war. Roman defenders repeatedly demonstrated extraordinary resilience at Abgersaton and Martyropolis, while commanders such as Bessas achieved significant battlefield successes against Persian forces in the region of Arzanene. At the same time, spies, diplomats, and political leaders worked behind the scenes, shaping events as much as armies in the field. The sudden death of Kavadh would ultimately transform the strategic situation, opening the door for a negotiated settlement between the two great powers.
This chapter examines the military, diplomatic, and political developments that brought the Iberian War to its conclusion, culminating in the so-called “Eternal Peace” of AD 532—an agreement that temporarily ended decades of Roman-Persian conflict and allowed Justinian to redirect his attention toward his ambitious western campaigns.
The Siege of Abgersaton
Following the battle of Callinicum, the Roman envoy Hermogenes traveled to the Sassanid court in an attempt to reopen negotiations. However, the Shahanshah, Kavadh, remained unyielding, still seeking to secure a strategic advantage over the Romans before considering peace. As part of this effort, he ordered an invasion of Osroene, targeting the fortified settlement of Abgersaton.
The city’s defenses were vulnerable due to its aging brick walls, making it an attractive target for the Sassanids. At the time, the Roman general Bouzes was stationed in Amida, having been side lined from recent campaigns due to illness. Nevertheless, he swiftly dispatched his nephew, Domnentiolus, with reinforcements to aid the defenders. The Roman garrison, despite being outnumbered, resisted with remarkable tenacity. Their archers inflicted heavy casualties, reportedly slaying 1,000 Sassanid soldiers. When their supply of arrows was exhausted, the defenders resorted to hurling stones from the battlements, continuing to inflict losses on the besieging force. Bouzes himself led a relief force from Amida, but his efforts proved futile.
Meanwhile, the Sassanids deployed an array of siege engines, eventually breaching the city’s weakened walls. Sensing an imminent assault, the Roman defenders prepared for a desperate last stand. As the Sassanid warriors surged through the breach, the garrison countered with ruthless efficiency. Abandoning the walls, they met the attackers head-on in brutal close-quarters combat, hacking down all who entered the city. The narrow passage, choked with fallen bodies, momentarily stalled the Sassanid advance.
Realizing that a direct assault on the breach was too costly, the Sassanids devised an alternative strategy. Under cover of darkness, they sent detachments armed with ladders to scale the walls at points left exposed by the Romans’ focus on the main breach. This tactic proved decisive. Once inside, the Sassanids unleashed a massacre, cutting down the defenders and the city’s inhabitants alike. Only a handful managed to escape the slaughter. With their objective achieved, the victorious Sassanid forces withdrew to their own territory, having demonstrated both their resilience and tactical adaptability in overcoming the determined Roman resistance.
Changes in the Roman High Command
During this time, Belisarius and his forces remained inactive, as the emperor had dispatched Constantiolus to investigate his conduct during the battle of Callinicum. The outcome of this inquiry led to Belisarius’ dismissal, suggesting that Constantiolus found the accusations of his detractors more credible. However, this does not necessarily mean that his assessment was accurate. As I mentioned in my previous video, there were differing interpretations of Belisarius’ actions, and the investigation’s conclusions may have been influenced by political considerations. In particular, it is possible that the decision to remove Belisarius was partly motivated by a desire to appease the Arab allies, whose loyalty was crucial to the Roman war effort. Following Belisarius’ dismissal, Mundus was appointed as the new Magister Militum per Orientem, assuming overall command of Roman military operations in the East. Additionally, Magister Militum Praesentalis Sittas was entrusted with the region’s defense, while Demosthenes was assigned to oversee the provisioning of cities and fortresses. This role placed him in charge of organizing the logistics necessary to sustain both defensive operations and future campaigns.
Diplomacy and the Search for Peace
At the same time, diplomatic efforts to pressure Kavadh were intensified. The Lakhmid king, al-Mundhir, attempted to initiate negotiations through a deacon named Sergius. However, this overture was rejected, though Sergius was sent back to al-Mundhir bearing gifts from the emperor—likely as a gesture to maintain diplomatic goodwill. Following this, Justinian responded directly to Kavadh in the wake of al-Mundhir’s initiative. He dispatched Rufinus to urge the Shahanshah to seek a peaceful resolution, emphasizing that “it is honorable and glorious to ensure peace between our two states.” Justinian also issued a bold, though ultimately unrealistic, threat: “If you do not do this, I shall seize the Persian land for myself.” While the claim lacked credibility, it was a strategically crafted statement. Given that Kavadh was nearly eighty years old, he would have been particularly concerned with securing a stable succession for his designated heir, Khusro, and likely wished to avoid any additional instability. Later that year, Rufinus was sent to Kavadh once again, this time accompanied by Strategius. They carried gifts from both Emperor Justinian and Empress Theodora, intended for the Shahanshah and his wife. However, their diplomatic mission was halted at Edessa, as Kavadh postponed their audience until he had launched yet another invasion of Roman territory.
The Battle of the River Nymphius
The remaining military operations of the war occurred further north, where the campaigning season did not begin until summer. During this period, the Sassanids launched a final attempt to capture the Roman stronghold at Martyropolis. Meanwhile, Magister Militum per Armeniam Dorotheus took the offensive in Persarmenia, successfully securing several key Sassanid fortresses. Kavadh’s decision to besiege Martyropolis was influenced by events that had unfolded earlier that summer along the frontier between Sophanene and Arzanene. Gadar the Kadisene, a local commander responsible for defending Arzanene on behalf of the Sassanid king, led an incursion into Sophanene. Commanding a cavalry force of approximately 6,000 men, he raided the lands surrounding Attachas, plundering the region and disrupting Roman defenses.
The Dux stationed at Martyropolis, Bessas, responded swiftly to the Sassanid incursion by launching a counteroffensive. Leading a force of 500 cavalry, he marched out of Martyropolis and engaged the enemy near the River Nymphius, in the vicinity of Amida. However, his initial attack failed, as the Sassanid forces mounted a determined and well-coordinated defense. Unable to break their lines, Bessas was forced to retreat.
Buoyed by their successful defense, the Sassanid cavalry made a critical mistake. In their eagerness to press their advantage, they abandoned their formation and pursued the retreating Romans in a state of disorder. Recognizing the opportunity, Bessas seized the moment. He swiftly ordered his troops to wheel around and launch a sudden counter-charge. The Roman cavalry, now attacking with precision and discipline, crashed into the scattered Sassanid riders. The ensuing engagement was a massacre—2,000 Sassanid cavalry were cut down in the chaos.
The rout continued as the surviving Sassanids fled toward the River Nymphius. Many, in their desperation to escape, attempted to cross its strong currents, only to be swept away and drowned. The Romans not only secured a decisive victory but also captured several Sassanid generals and battle standards. Among the fallen was the Sassanid commander, Gadar, while Yazdgerd, the nephew of Hormizd, the governor of Arzanene, was taken prisoner.
Emboldened by his triumph, Bessas carried the offensive further by ravaging the lands of Arzanene. This act was more than just a military maneuver—it was a direct affront to the Sassanid Shahanshah, as the province was considered his personal domain. This bold display of Roman aggression sent a clear message to the Sassanid court, underscoring the empire’s resilience and ability to strike back.
The Siege of Martyropolis
The raid on Arzanene deeply angered Kavadh, prompting him to launch yet another invasion to avenge the Roman incursion and punish Bessas. To this end, the Sassanids assembled a larger army under the command of Chanaranges, Aspebedes, and Mihr-Mihroe, with the objective of besieging Martyropolis. The city was defended by Bouzes and Bessas, but its fortifications were incomplete, making it vulnerable to attack. The walls had been constructed only recently, provisions were insufficient, and the garrison lacked siege engines, further compromising its defensive capabilities. The Sassanid force included a contingent of Hunnic cavalry, recruited by Mihr-Girowi, which added to the army’s mobility and striking power. Their campaign began with an invasion of Roman Mesopotamia, after which they advanced northward, passing through the rugged terrain of Tur Abdin before crossing the Tigris into Sophanene. Even without Bessas’ recent victories, Martyropolis had long been a strategic concern for the Sassanids. The city functioned as both a staging ground and a refuge for Roman forces, allowing them to conduct raids deep into Persian territory, particularly in Arzanene. The renovations undertaken there by Emperor Justinian in 528 had only increased its strategic importance, making it an even greater threat to Sassanid control in the region.
By September 531, the Sassanid army had established its camp outside Martyropolis and begun a determined siege. The Roman defenders, unprepared for an assault so late in the campaigning season, faced severe shortages of supplies and feared that they would not be able to withstand a prolonged attack. Kavadh had issued strict orders that the army was not to return until the city had fallen, compelling the Sassanid commanders to employ every possible method to breach its defenses. The besiegers launched a multi-pronged assault, employing mining operations to undermine the walls, constructing a mound to provide a direct approach, and erecting scaling ladders for an infantry assault. Additionally, they built a massive wooden siege tower, designed to provide cover and allow their troops to storm the walls. Yet, despite their efforts, the defenders of Martyropolis proved as resilient as those of Amida three decades earlier, responding with ingenuity and determination. One particularly clever countermeasure turned the tide of the siege. Within the city, the defenders hastily constructed an even taller tower, giving them the advantage of height over the Sassanid siege tower. From this elevated position, Roman archers and slingers rained missiles down upon the attackers, rendering their tower ineffective. Then, in a final stroke of ingenuity, the Romans deployed a siege engine that dropped massive stones onto the Sassanid forces below. The impact was devastating—siege equipment was crushed, soldiers were buried beneath the rubble, and the carefully coordinated assault dissolved into chaos. Despite their superior numbers and siege technology, the Sassanids found themselves frustrated by the city’s stubborn resistance. The defenders, though undersupplied, fought with remarkable ingenuity, forcing the Sassanids to reassess their strategy as the siege dragged on.
The Sassanids soon found that the defenders of Martyropolis held several key advantages that had been absent during the siege of Amida in 502. First, the city’s garrison included Bouzes and a substantial Roman force, likely reinforced by the numerus stationed there by Justinian in 528. Their presence significantly bolstered the city’s defensive capabilities. More crucially, however, Roman reinforcements were already on the move. As the siege wore on, Magister Militum Praesentalis Sittas assembled a large Roman army and was joined by al-Harith and Hermogenes. By October or November, their combined forces had reached Amida. From there, they advanced to Attachas, a position just 20 kilometers north of the besieging Sassanid army. By this time—likely November or December—the mere presence of the approaching relief force was enough to shift the course of events. The harsh winter climate had already begun to take its toll on the Sassanid besiegers, and the rumor of a large Roman army advancing toward them only added to their mounting difficulties.
Hermogenes and the Intelligence War
During this time, a highly skilled Sassanid spy defected to the Romans, revealing critical state secrets to Emperor Justinian. Among the most valuable intelligence he provided was the impending invasion of the Sabir Huns, who had been enlisted as allies of the Sassanids. Recognizing an opportunity for deception, Justinian devised a brilliant stratagem: he sent the defector back to the Sassanid army with false information, claiming that the Huns were instead preparing to fight alongside the Romans. This psychological maneuver was masterfully executed, sowing confusion and uncertainty among the Sassanid ranks. It is unlikely that the timing of these espionage activities—both the presence of Roman and Sassanid spies and the defection of a double agent—was mere coincidence. At the heart of these operations was Magister Officiorum Hermogenes, a key figure in the Roman administration. As Magister Officiorum, he not only oversaw governmental and diplomatic affairs, functioning as a de facto prime minister and foreign minister, but also served as the empire’s chief spymaster. His role in orchestrating these intelligence efforts suggests that he was one of the most capable spymasters the Romans ever had, skillfully using deception and counterintelligence to gain an advantage over the Sassanids.
The Death of Kavadh and the Accession of Khosrow
Upon learning of the setbacks suffered by the Sassanid forces, Kavadh experienced a sudden paralysis on the right side of his body on 8 September 531. Aware that his time was short, he formally designated his second son, Khosrow, as his successor by placing a crown upon his head. His most trusted advisor, the Hazarbed Mebodes, urged him to put this decision in writing to secure Khosrow’s claim. Five days later, on 13 September, Kavadh passed away at the age of 82. According to the historian Malalas, his reign had lasted 43 years and two months. Following Kavadh’s death, a succession dispute arose. His eldest son, Kawus, assumed that he would inherit the throne and laid claim to it after his father’s burial. However, Mebodes opposed his claim, and the matter was put to a vote among the Sassanid nobility. The magnates ultimately confirmed Khosrow’s right to rule, largely due to the written declaration left by Kavadh. With his position now secure, Khosrow sought to consolidate his authority by pursuing diplomatic stability. He immediately sent a message to the Roman ambassadors, inviting them to enter Sassanid territory to negotiate a peace treaty. Meanwhile, news of Kavadh’s death quickly reached the Sassanid forces besieging Martyropolis. Recognizing that the new ruler was more inclined toward peace and unwilling to continue the costly campaign, the besiegers abandoned their positions and withdrew into Persian territory. However, Hermogenes, acting as the Roman envoy, refused to proceed with negotiations without receiving explicit authorization from Emperor Justinian. This approval soon arrived, allowing peace talks to formally commence.
The arrival of the Huns to support the Sassanids came only after peace negotiations had already begun, and their invasion ultimately proved to be a failure—despite claims to the contrary by Zachariah and Malalas. These sources exaggerate the extent of the Hunnic success, stating that the invaders plundered the Armenian provinces before crossing the Euphrates and launching raids as far as Euphratesia, Kyrrhestike, and even the outskirts of Antioch. They also suggest that only a few Roman commanders—Bessas, the dux of Citharizon, and Dorotheus—offered resistance and managed to recover some of the stolen goods. However, the account of Procopius, which downplays the significance of the Hunnic invasion, is far more credible.
The evidence strongly suggests that the Roman response to the Huns followed established military doctrine with precision. Forewarned of the impending invasion, the Romans had ample time to implement defensive measures. Most of the civilian population, along with their valuables, was relocated inside fortified cities, leaving the countryside barren and denying the raiders easy plunder. As a result, the Huns found little to sustain their campaign, and their attacks were largely ineffective. Roman strategy relied on a combination of shadowing and guerrilla warfare, utilizing fortifications and ambushes to weaken the enemy. Once the Huns began their retreat, exhausted and demoralized from their largely unsuccessful raids, Roman forces were able to strike at their leisure. This tactical approach ensured that the invaders suffered heavy losses while achieving minimal gains. The only civilians likely to have suffered at the hands of the Huns were those who, for whatever reason, failed to take refuge in the fortified settlements.
The Peace Treaty of AD 532
After a prolonged period of negotiations, Khosrow, the newly crowned Shahanshah of Persia, and Emperor Justinian reached a formal peace agreement, which was ratified in the spring of 532. Under its terms, both parties committed to the mutual exchange of fortresses captured during the conflict. The Romans ceded Pharangium and the fortress of Bolum to the Sassanids—an important concession, as these territories were rich in gold production—while the Sassanids returned the fortresses they had taken in Lazica. Additionally, both sides agreed to repatriate prisoners of war. Among those returned to the Romans was Dagaris, who, according to Procopius, later distinguished himself by repeatedly defeating the Huns in battle and expelling them when they attempted to invade Roman territory. A crucial element of the treaty was Rome’s agreement to pay a one-time sum of 11,000 pounds of gold. The Romans also agreed to relocate the headquarters of the Magister Militum per Orientem from Dara to Constantia. Both parties also proclaimed the establishment of what was described as an “eternal peace.” For the Romans, this financial settlement was manageable—the amount constituted only half of Egypt’s annual tax revenue. More importantly, securing peace in the East allowed Justinian to redirect his military focus toward the West, enabling him to take action against Gelimer for his overthrow of the pro-Roman Vandal king, Hilderic, and to begin his ambitious campaign of imperial restoration.
© 2026 History and War
Author: Jishu Roy
Unauthorized reproduction of this content is prohibited.