Copyright © Cyowari
The End of the Truceless War
The Battle of Leptis Parva in 238 BC brought the Truceless War to its decisive conclusion. This article examines the final phase of the conflict, beginning with Carthage’s full mobilization following the defeat and death of the commander Hannibal. It explores the reconciliation of Hanno and Hamilcar Barca, whose renewed cooperation allowed Carthage to coordinate its military operations against the remaining rebel forces.
The article then follows the Carthaginian pursuit of Mathos after his withdrawal from Tunis into Byzacium, examining the successive engagements that gradually weakened the rebel army and led to the final confrontation at Leptis Parva. Particular attention is given to the composition and strength of the opposing forces, the circumstances surrounding the final battle, and the limited evidence available for reconstructing its course.
Finally, the article examines the aftermath of the battle, including the suppression of the remaining rebel strongholds, the capture and execution of Mathos, and the broader consequences of the revolt for Carthage. Together, these events marked the end of one of the most prolonged and destructive internal conflicts in Carthaginian history.
Carthage Mobilizes for the Final Campaign
When news of Hannibal’s unexpected defeat reached Carthage, it plunged the population once again into grief and despair. Just as the people had begun to regain confidence, their hopes were abruptly dashed. Yet, despite the emotional blow, the Carthaginians did not hesitate to act decisively. The Senate appointed thirty of its members, along with the previously dismissed general Hanno, and mobilised all remaining men of military age—treating the situation as a final, desperate effort to save the republic—and dispatched them to reinforce Hamilcar Barca. The Senate gave the thirty envoys a specific and urgent mandate: to do everything possible to reconcile Hamilcar and Hanno, whose prior disagreements had hindered cooperation. Given the seriousness of the crisis, the senators were instructed to ensure that the two commanders would now take joint counsel and act in unison. Their efforts proved successful. Through a range of persuasive arguments presented at the meeting, the senators ultimately compelled both Hamilcar and Hanno to put aside their differences and cooperate for the greater good.
Hanno and Hamilcar Reunited
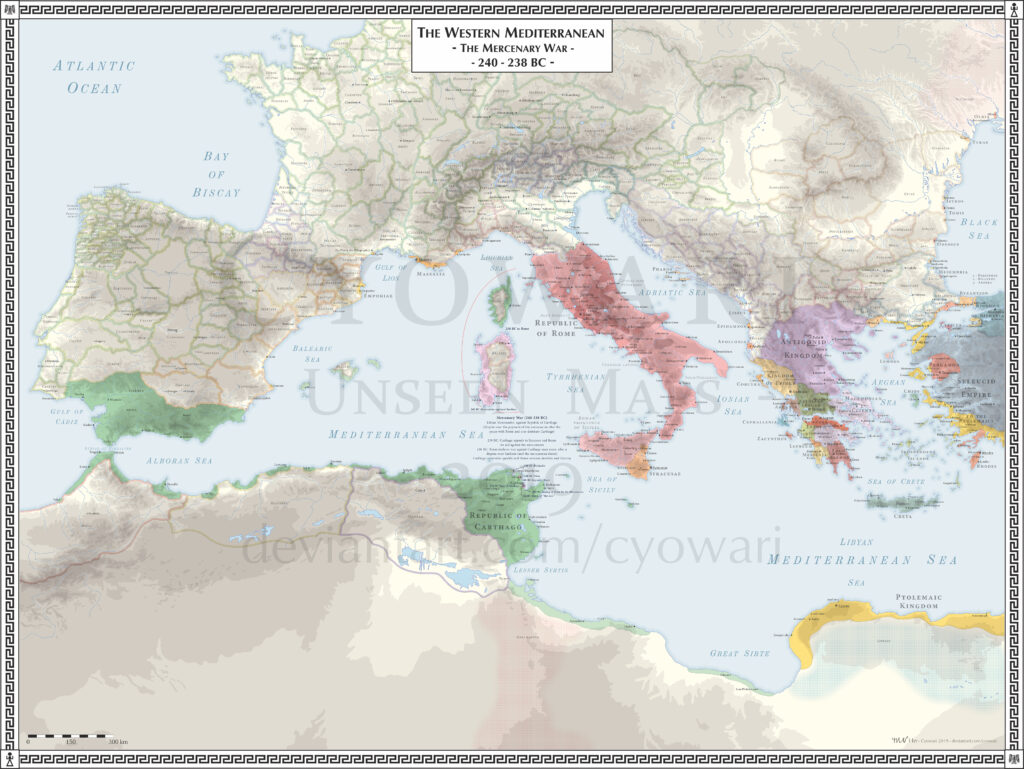
The sequence of events that followed is particularly difficult to reconstruct, largely because Polybius, eager to bring the narrative of the war to a close, offers only the briefest of details. What is clear is that Hamilcar and Hanno were not far behind Mathos in the pursuit. They likely advanced through Tunis, now deserted, rather than taking the longer route west of the city—which would have risked leaving the road to Utica open for the rebels to escape north. Polybius’ emphasis on the renewed cooperation between the generals suggests that, at some point—either from the outset or as they approached the Gulf of Hammamet—they divided their forces in order to maintain continuous pressure on Mathos from multiple directions. The most logical arrangement would have seen Hamilcar command his own veteran troops, along with the remnants of Hannibal’s defeated division, while Hanno led the newly raised forces from Carthage. It is plausible that, in the series of engagements that followed, the Carthaginian commanders sought to gradually exhaust Mathos’ forces and, ideally, compel him into a decisive confrontation. Polybius mentions that these clashes occurred “around Leptis and some of the other cities.” Repeatedly defeated and with his field army steadily shrinking, Mathos eventually opted for a final gamble: he committed to a pitched battle, hoping to reverse the tide.
Polybius notes that both sides called on their remaining allies and garrisons at this stage. For the rebels, however, their allies were few and scattered, especially in central Libya. Any rebel forces attempting to move east would likely have been intercepted by Hanno or Hamilcar. The only significant garrisons left were at Utica and Hippo Diarrhytus, and sending troops from these locations would have required a perilous 200-kilometre march. Other parts of Libya may have still held out, but they too could not afford to send help. Ultimately, Mathos had to rely on whatever local forces he could gather. The rebels likely had around 20,000 men after leaving Tunis, though desertions on the march probably reduced their numbers. Some may have fled to their hometowns or ports in search of escape, and perhaps even a few joined Hamilcar. While the Carthaginian army also faced desertions, few would have joined the rebels. Ongoing skirmishes caused further losses, but with some reinforcements arriving, Mathos may have rebuilt his force to about 20,000 by the time of the final battle.
It’s unclear exactly where the Carthaginians got their reinforcements from. Most Libyans were still seen as unreliable after the revolt, so few would have joined. The generals may have requested more troops from Carthage, which wasn’t under immediate threat. New mercenaries were likely still arriving, and Carthage had the weapons to arm them. Local militias from Byzacium and Cape Bon may also have been added to the army. By the time of the final battle, the Punic forces were likely stronger than the rebels. Hamilcar and Hanno initially had around 25,000 troops, but after reinforcements and some casualties, they probably had at least 30,000. This battle likely took place in late 238, around eight to ten weeks after their arrival in Byzacium, allowing time for the clashes and reinforcements to arrive on both sides.
The Final Battle at Leptis Parva
The location and details of the final battle in Byzacium are unknown. Hamilcar and Hanno likely aimed for a decisive victory from the beginning, while Mathos hoped to delay them and either secure peace or escape. In the end, he realized a full-scale battle was his only option. Polybius describes the final battle as a formal set-piece engagement, with both armies facing off and clashing at an agreed signal. By this stage, Mathos’ forces were no longer the seasoned veterans of earlier campaigns. Many of his original comrades—from the army that had served in Sicily—had already been killed in battle, trampled by elephants, executed, or lost to disease. Now, he mostly commanded local Libyans who had joined during the rebellion. Polybius even refers to them simply as “Libyans,” suggesting this shift in the army’s composition. Though these men were tough and courageous, they likely faced superior numbers and had the disadvantage of a less experienced commander. Mathos had previously relied on others—like Spendius—for battlefield leadership. His recent victory over Hannibal had come from exploiting that general’s carelessness, not from tactical brilliance. Against the disciplined and determined forces of Hamilcar and Hanno, Mathos could no longer rely on such an advantage. The result of the battle, therefore, was predictable.
According to Polybius, most of the Libyan rebels were killed during the battle. Some survivors fled to a nearby town, where they soon surrendered. Mathos himself was captured, bringing the rebellion to an end. Polybius gives very few details about how the battle unfolded, so it’s hard to reconstruct the exact course of events. However, we can assume that Hanno and the Numidian leader Naravas took part in the fighting. Still, it was Hamilcar who received most of the credit, clearly recognized as the senior commander in the campaign.
The fact that some rebels surrendered after the battle suggests that Hamilcar was once again offering mercy to defeated enemies. Showing clemency made sense at this stage. With the rebellion nearly over and its leaders dealt with, further brutality would achieve little. Instead, sparing the lives of captured soldiers and showing leniency to towns that surrendered was a more practical and constructive approach to restoring order.
The Libyan countryside was quickly brought back under control. Only Utica and Hippo Diarrhytus resisted for a short time, fearing harsh punishment from Carthage. But by early 237 BC, both cities were captured and forced to accept terms. Most rebels who were taken alive were crucified—except for Mathos. In 237 BC, he was paraded through the streets of Carthage in a mock triumph, perhaps a twisted version of the victory procession he had once imagined for himself. As he was dragged through the city, young Carthaginians tortured him in brutal and humiliating ways. In the words of the historian Polybius, a war that “far excelled all wars we know of in cruelty and defiance of principle” came to an end with a death that was equally grim and symbolic.
Aftermath and Historical Significance
After three years and four months, the mercenary revolt was finally brought to an end, but the cost was devastating. The loss of human life and resources was immense, and the extreme brutality on both sides only added to the suffering. Much of this could have been avoided if Carthage had fulfilled its original obligation to pay the Sicilian veterans. In the end, the small debt they tried to avoid paying was nothing compared to the vast cost of the war. The rebel leaders met gruesome ends, mirroring the cruelty they themselves had shown. The entire conflict stands as a grim example of how betrayal undermines loyalty, and how cycles of terror only fuel more violence.
© 2026 History and War
Author: Jishu Roy
Unauthorized reproduction of this content is prohibited.